Monday, January 28, 2013

So Close... Yet So Far Away...

Saturday/Sunday, 01.26/27.2013:  Spent a good portion of this last weekend oiling my air filters, de-rusting parts, and putting things back on the frame.  I had really high hopes of the bike starting.  I tested the spark plugs by laying each plug on top of the engine and stepping on the kick pedal.  Both of them shot sparks, so that would imply that my spark plug wires and ignition coils are still good.  I soldered a severed wire for the back right turn signal.  I checked and adjusted the gaps for my contact breaker points...  The list goes on and on.  I was going to take off the stator (alternator) cover and check and adjust ignition timing, but decided against it until I drained the oil again.  There seems to be some oil inside of that cover.  Surely the alternator isn't completely submerged in oil, but I'm wondering if it has some sort of self oiling mechanism that lets some of the oil in from the left crankcase?

I also lubed up the throttle cable with some PB Blaster.  The housing was broken in a couple of spots and was causing the throttle grip to stick open.  Amazingly the PB Blaster fixed it.  Aesthetically, it may not be the prettiest cable to look at, but it has definitely sprung back to life!

Anyway, got her back to together Sunday morning, poured some fuel in the tank.  Turned the (new) fuel petcock from off to on and... nothing.  So, we turned it all the way over to reserve and finally started to see some gas flow down through my new 1/4" clear fuel lines and inline fuel filters all the way to the carburetors.  So far, so good!  I turned the key in the ignition switch, closed the choke, and pressed the starter button...  Amazingly the starter sounded pretty healthy considering the bike has been sitting for so long.  It wanted to start so badly (or maybe it was me who wanted the bike to start so badly?)!  My buddy, George, noticed that the left carb overflow vent was working (i.e. the float height needed adjusted because the gas was filling up inside of the carbs float bowl and overflowing).  And so that meant taking the left carb back off of the bike, draining it, and then opening the float bowl.  I built a homemade float height gauge out of an old O'Charley's gift card (the float height needed to be 20mm).  Strange thing is, the height was closer to 22mm when I took my initial measurement and you'd think, if anything, that it would have been less than 20mm and would have been the cause of the float not doing its job of keeping gas from filling up and overflowing like it was.  For grins, I went ahead and adjusted it to 20mm anyway.  Buttoned it back up and put it back on the bike.

I poured a little more gas in the tank this time - thinking that perhaps that was why the petcock's 'on' setting wasn't working previously - turned the petcock to 'on' and nothing...  Turned it all the way over to 'reserve' and nothing.  Gas flow to the carbs work by gravity.  So, it could be that there was some residue that I wasn't able to rinse out of the tank that ended up clogging my new petcock.  Or, maybe the inline fuel filters I bought had already clogged?  To troubleshoot this, I'll likely just disconnect the fuel lines at the carbs and work my way up the lines, to the filters, then to the petcock, and finally the tank.  Good times!

Well, it's back to the drawing board...

Here are a few pics of how things were shaping up prior to yesterday's attempts at starting her up.


Monday, January 21, 2013

Carbs Are Back On the Bike

Sunday, 01.13.2013:  Things always take longer than expected when working on a project like this...  Disclaimer aside, I lost steam on Sunday and while originally hoping to get the carbs, fuel tank, fuel lines and filters back on the bike so I could try starting it, I only ended up putting new allen head fasteners on the carbs and putting them back on the bike.  Progress nevertheless...


Front Drive Chain Cover and Oil Change

Saturday, 01.19.2013:  Whew!  I had to use a ton of PB Blaster penetrating lubricant, patience, and elbow grease in order to get some of these fasteners loosened up.  Things finally loosened up and I was able to get the gear shifter lever and front drive chain cover off of the bike.

Here are some before and after pics:


Looks like a critter was having dinner inside of the front drive chain cover in the picture above!

Here is an after shot - used a flathead screwdriver, some brake parts cleaner, and some old toothbrushes to get out all of the crud!


Sunday, 01.13.2013: Cleaned out the oil filter/pump, installed a new o-ring, and then drained and replenished 3 qts of Valvoline 10W-40 4-stroke motorcycle engine oil.  Meant to take more pictures here; particularly of the oil pump parts and assembly, but all I got was a shot of this rusty old engine oil drain plug. 


I'll document it better when I change the oil again in a few days.  You may be asking, "You're changing the oil again in just a few days?"  To which I reply, "Yep."  I'm going to dump about a cup of kerosene into the crankcase to help loosen up any funky stuff, carbon deposits, etc. that may have built up over time inside of the engine, let that burn off (assuming the bike fires up), and then drain and refill the oil a second time.

Pulling Stuff Off of the Frame...

In an attempt to clean up some of the rust and crud on the battery case, I disconnected a couple of things like a relay switch and the starter solenoid.  I also had to take off a couple of other parts like the toolkit holder.  Without a welding torch (and some extensive training), I'll likely have to leave the OEM air filter connector tube welded to the bottom of the battery case.  Not a huge deal since it will be covered up with aftermarket Uni foam air filters and the original side covers.  I considered buying some tapered K&N filters or even some shorty velocity stacks, but didn't want to get into having to tune these Keihin carbs (at least not until I can make sure that I can get the bike running).


I've done a bit of research on stripping powdercoated paint, and in order to save some money, I'm going to just sand this down by hand and dremel tool.  This should get most of the rust off.  And then I'll just use some black rustoleum spray paint as a temporary fix since the battery box will be hidden by the side covers and seat anyway.  Down the road, I hope to save up enough to have the frame glass or bead blasted and powdercoated.  I also hope to have the fenders re-chromed.  I'm shooting to do this next winter (Dec 13 - Jan 14 time frame).  Right now I'm just crossing my fingers that this puppy will fire up!


Wednesday, January 16, 2013

Fuel Tank (Rust Removal - Part 2)

My second (free) batch of MetalRescue arrived at my doorstep just after the holidays.  I finally got around to giving my fuel tank another soak.  I even took a hairdryer and warmed up the MetalRescue in an attempt to shorten the soak time.  I was even able to get the fuel cap vent out of the cap and let it soak for a few hours before I put a new rubber seal/gasket on it.  All that to say, I think this may be as good as it's going to get.  I sprayed the inside of the tank with WD-40 Long Term Rust Inhibitor since the tank will be sitting in my garage for the next couple of weeks.  I bought a couple of "retro" chrome and glass inline fuel filters to run between the fuel petcock and the carbs, so they should catch any rust (or other particulates) that the MetalRescue might have missed.


Tuesday, January 15, 2013

Carb Gasket Kits

Saturday, 01.12.2013: Got a bunch of parts in the mail this weekend from Dime City Cycles and Old Bike Barn (I've been relying mainly on Dime City because they specialize in Honda CBs.)  One (or two) of those parts were my Keihin 14H gasket and o-ring kits.  Happily replaced my gaskets and o-rings (where applicable) and sealed them back up.  I'm still on the fence about soda blasting...


Carb Cleaning

Saturday, 01.05.2013: Couldn't sleep; so I decided to get up and start working on pulling the carburetors off of the CL.  Because of the high exhaust pipes, I wasn't able to to get the left side cover and air filter off, which meant first taking off the exhaust...  This set me back about 15 minutes or so - not a big deal.  After taking out the original paper air filters (no amount of compressed air and oil was going to be able to salvage them), disconnecting the throttle cable(s), loosening the carb intake boot clamps, and a couple of good wiggles and tugs, out came my Keihin 14H CV carbs.


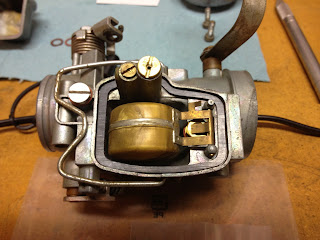
All-in-all, they really weren't in too terrible of shape.  I broke out the Berryman B-12 Chemtool and started disassembling, spraying, scrubbing and soaking both aluminum and brass pieces.  I started with the left carb. Here are a few shots of the progression:


The air inlet screw was missing its o-ring and I think the previous owner may have put the spring and washer on in the wrong order the last time he cleaned them.  Oh well.  I used a very thin beading needle to clean out the jets and then some compressed air to blow anything that might still be lingering.

The right carb was a lot dirtier on both the outside and inside.  Here are a few pics of the right and then both left and right after they had been cleaned:


Still a bit of rust on the choke butterfly.  I ordered some Wash-Safe Rust Off through the mail.  So when i get it, it should be a matter of just spraying it on and wiping it off with some paper towels after a minute or two.  I'm also considering just sanding and then soda blasting the carbs and engine.  The results look pretty decent from what I've seen on the interwebs and the setup cost is within my budget (maybe a total of $10 for a bucket of baking soda and a couple of feet of clear tubing) compared to taking this stuff somewhere and having it sand or bead blasted for an astronomical price.  I'm willing to give it a little more elbow grease if it allows me to save some money for the remaining parts I need to order (clip-ons, grips, clutch, throttle, and brake cables to name a few).

Tuesday, January 8, 2013

Fuel Tank (Rust Removal - Part 1)

Sunday, 12.16.2012:  Powerwashed the inside of the fuel tank.  Poured a handful of small BBs into the tank and shook it around vigorously to breakup any loose rust.  Then I soaked the tank with MetalRescue for 24 hours rightside up (Sunday, 12.16 through Monday, 12.17).

Monday, 12.17.2012:  Turned the tank upside down and soaked it for an additional 24 hours (Monday, 12.17 through Tuesday, 12.18).  I covered the gas tank filler hole with cling wrap and rubber bands to avoid leaking out any MetalRescue.  The fuel cap's rubber gasket is badly in need of being replaced.


Before #1

Before #2

After Pressurewash (Hot Water and Dawn)


Tuesday, 12.18.2012:  Emptied fuel tank after 48 hours soak time.  Disappointed with the results...  Still a considerable amount of rust inside of tank - along with small chunks of rust.  I powerwashed the inside of the tank again in an attempt to flush out any residual rust and then poured some rubbing alcohol into the tank and shook it around to dry up any remaining water.  I also used an air compressor and a hair dryer to finish it off.

MetalRescue #1

MetalRescue #2

MetalRescue #3

MetalRescue #4

MetalRescue #5


Once the tank dried, I removed the fuel petcock to find that the everything had pretty much disintegrated or was badly corroded.  I disassembled the petcock to inspect all parts. The screen filter was missing and all of the rubber gaskets were hard.

Wednesday, 12.19.2012:  Ordered an OEM replacement from Out West Motorcycles in Tigard, OR for $30 (including shipping).


Thursday, 12.20.2012:  Sent an email to MetalRescue, along with before and after photos.  They are sending free MetalRescue for me to use in a second soak.